How to create a Lesson using the Drag and drop into Image Component?
Using this component, you can create Drag and drop type of questions using both text and images as draggable alternatives. This type allows learners to drag a piece of text or an image and drop it on one or more corresponding drop zones.
When to use this Component
Drag and drop into Image questions can be used to test the learner's knowledge on a given topic as a variation to Multichoice questions. This type enables the learner to associate two or more elements and to make logical connections in a visual way.
How it works
-
Description and instructions can be given in a text box.
-
Drop zones and draggable text boxes or images are placed in their initial places.
-
Drag the correct draggable textboxes or images and drop them into the predefined drop zone over the image.
-
Click the Check button to check if the dragged answers are correct or not.
-
If the user has dropped any correct answers, it will be highlighted in green. If the user has dropped any wrong answers, it will be highlighted in red.
-
The user can drag back the wrong answer to their initial locations.
Features of this Component
-
You can make images as draggable items as well.
-
You can set the background opacity for draggable texts or images individually. You can override the opacity for all the draggable items as well.
-
Tip texts can be added to each item.
-
You can create infinite number of element instances.
-
You can create any number of drop zones and draggable items and associate them as per your needs.
You can create a page using this component by following the below steps.
Step 1: Go to the required Slide

If you are creating a new Presentation, you will be taken to the first slide where you can use this component and create a page. Alternatively, if you want to add a new slide where you want to use this component, click on the '+' icon on the lower right corner as shown in the above image.
Step 2: Click on the Drag and Drop into Image Component Icon

Then click on the Drag and Drop into image Component icon as shown in the above image.
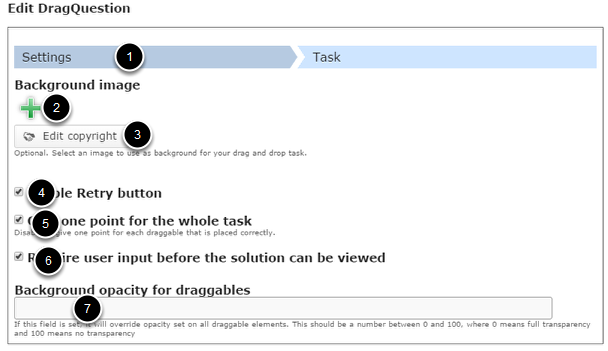
You will be taken to the Settings [1] tab of this component as shown above. On the Settings tab, you can
-
You can add a background image for the card using the ‘+’ icon below the Image [2] field and edit its copyright details by clicking the Edit copyright [3] button.
-
Enable retry option by clicking on the Enable Retry button [4] checkbox.
-
Disable to give one point for each draggable item that is placed correctly by checking the Give one point for the whole task [5] checkbox.
-
Check Require user input before the solution can be viewed [6] checkbox to make sure that the user should drag something into the drop zone before he/she can view the solution.
-
Type the opacity value in the Background opacity for draggables [7] text.
Step 3: Add Background Image

You can add an optional image for the card by clicking the '+' icon under the Background image title as shown in the above image. You will choose an image file as shown in the below image.

On the above screen, select the required image [1] and click the Open [2] button. You can see image being uploaded as shown in the below image.

Once the image has been uploaded, it will be shown under the Image title as shown [1] in the below image.

Optionally, you can update the copyright details of the uploaded image by clicking the Edit copyright [2] button shown above. Once you click the button, you will see the below screen.

You can enter the image's copyright details on the above screen and click the Close button to update it. You can remove the uploaded image by clicking on the Remove file button shown on the below image.

You will be prompted to remove the image as shown in the below image. Click OK to confirm and remove the image.

You can also update the image without removing it by clicking on the image.
Step 4: Enable Retry Button (Optional)
If you click the Enable Retry button checkbox, you can give more chances to the user to retry. This option is optional. By default, it is enabled.
Step 5: Enable Give One Point for the whole Task (Optional)
By default, the user will be given one point for each item that he/has placed correctly. You change it to give one point only to the whole task by checking the Give one point for the whole task checkbox. This option is optional as well. It is enabled by default.
Step 6: Enable Require User Input before the Solution can be viewed Checkbox (Optional)
If you check the Require user input before the solution can be viewed checkbox, then the user must drop some element on the drop zone before clicking the check button to view the correct answer. This option is optional as well.
Step 7: Set the Background Opacity for the Draggable Items (Optional)

You will be prompted to set the background opacity for each draggable item in this component. However, you can override the background opacity for each draggable item by typing the background opacity in the Background opacity for draggables field shown above. This should be a number between 0 and 100, where 0 means full transparency and 100 means no transparency.
Step 8: Move to the Task Tab

Once you've updated all the information in the Settings tab, click on the Task [1] tab. You will see the above screen. On this screen, you can
- Add drop zones buy clicking the Drop Zone [2] icon.
- Add label or draggable text boxes with answers by clicking the Insert text [3] icon.
- Add draggable images by clicking the Insert image [4] icon.
- Organize the boxes in the Background Area [5] of the task. The background image will appear here.
Step 9: Add Drop Zone

Then click on the Drop Zone icon shown above. Drop zones are the areas on which draggable text boxes and Images can be dropped.
Step 10: Edit Drop Zone Settings

On this screen, type the label for the drop zone in the Label [1] field. You can also change the format of the text. This field is mandatory and must have some text in it. This label won't be shown to the user by default. If you want it to be visible, check the Show label [2] checkbox.
Type the background opacity value in the Background Opacity [3] field. The value must be between 0 and 100. This field is optional. We need to set it to 0 since we want the background visible. You can also add a tip to this drop zone by typing it in the Tip text [4] field under Tip title.
You can make this drop zone to hold only one draggable item by checking the This drop zone can only contain one element [5] checkbox. Once you’ve checked this option, the user won’t be able to add more than one item into this drop zone.
Once you’ve added all the changes, click the Done [6] button to save the changes. You can also remove or cancel this drop zone by clicking the Remove [7] button shown above. Once you click the Done button, you will see the below screen.

You can see the drop zone you just created on the top left corner of the uploaded image. Move and resize the drop zone so that it is placed roughly over the background image. You move the drop zone by clicking and dragging it to where you want it be placed. You resize the drop zone by clicking the lower right corner of the drop zone and dragging up/down or left/right to scale the drop zone to the right proportions.

Resize and drag and drop the drop zone over the specific area of the image. You should now have something like the above image.
Step 11: Add draggable Answer Boxes

We are about to add some draggable text boxes with answers to the task. To do that, click the Insert text icon shown in the above image. You will see the below image.

On this screen, type the label of the draggable text box in the Label [1] field. You can also change the format of the text. This field is mandatory and must have some text in it. Then select the drop zone for this box from the list of drop zones under Select drop zones [2] title, in our case, a drop zone named Drop Zone. Check this checkbox.
Then set the background opacity for the draggable text box in the Background Opacity [3] field. We set it to 75 to make it semi transparent.
You can clone this draggable checkbox, so that the cloned items can be dragged to multiple drop zones. To do that, check the Infinite number of element instances [4] checkbox. We leave it unchecked for our task. Once you’ve added all the changes, click the Done [5] button to save the changes. You can also remove or cancel this drop zone by clicking the Remove [6] button shown above. Once you click the Done button, you will see the below screen.

The just added draggable answer box is added to the top left corner of the task page. You can just resize or drag and drop the draggable answer box to your desired place. Similarly, you can add as many draggable answer boxes as possible.

In the above image, you can see 5 draggable answer boxes being added to the task. You can view the drop zone [1], draggable answer boxes [2] and some description text [3] as shown in the above image.
Text description text above the drop zone and draggables won't be draggable. You can add such non-draggable text boxes just by leaving the drop zones unchecked under the Select drop zones title.
Adding draggable Images

You can also add draggable images to your task. These images will work just like the draggable text boxes and you can drag them into the drop zones. To add a draggable image, click the Insert image icon shown in the above image. You will see the below image.

You can add an draggable image by clicking the ‘+’ icon under the Image [1] title and edit its copyright details by clicking the Edit copyright [2] button shown above. You can also add some alternative text that will be displayed if the browser can't load the image in the Alternative Text [3] field. This field is also used by readspeakers. You can also add a hover text in the Hover Text [4] field, which will be displayed when the user hovers his pointing device over the image.
You can add some more the copyright details of the image by clicking Copyright Information [5] field. Once you’ve uploaded the required image, check the drop zone under the Select drop zones [6] title. You can also set the opacity of the uploaded image in the Background Opacity [7] field. This value should be between 0 and 100.
You can clone this draggable image, so that the cloned images can be dragged to multiple drop zones. To do that, check the Infinite number of element instances [8] checkbox. Once you’ve added all the changes, click the Done [9] button to save the changes. You can also remove or cancel this drop zone by clicking the Remove [10] button shown above.
Step 12: Define correct Answers

In order to define which draggable elements are correct, just double click on the drop zone. You will have something like in the above image.
You will now see a Select correct elements [1] option. Check the checkboxes of the correct draggable items to define them as the correct answers. Then click the Done [2] button shown above.
Step 13: Click the Done Button

Once you've updated all the details, click the Done [1] button shown above to complete editing the page. You can cancel creating the page just by clicking the Remove [2] button shown above. If you click the Done button, you will see the below screen with a preview of the created page.
Step 14: Click the Create Button

If you still want to edit the page, just double click on the preview page, and you will be taken to the Edit page. If you've done all the changes, you can click the Create button as shown above picture to finish editing the page.

You can see the finished page as shown in the above image.
Notes
-
You can upload images only in .jpg, .gif and .png formats.
-
You can create any number of drop zones and associate draggable items to them.
-
Alternative Text for the images is mandatory.
-
If you don’t want the drop zone hide the image behind, set the drop zone’s background opacity value to 0.
-
The Drag and drop into Image question will be scaled to the maximum width of the page where it is placed, after clicking the Done button. The Size field defines the width and height of the editor as well as the aspect ratio of the Drag and drop question, rather than the actual size in pixels when it is viewed. So, set the task size equal to the dimensions of the background image.
-
You can double click the drop zones and draggable items to edit them at any time.